I have been into the electronics field since I was about 11 years old. I reached that phase of my life where I began taking everything apart and wondering what all this 'stuff' inside these electronic devices was. It wasn't too long until I began understanding and learning while making my own analog and digital designs come to life. Eventually I reached a point where my current tools were just not allowing me to really debug and see what was going on inside the circuit I was designing. This is where I realized I needed better equipment than what I had.
Throughout this post I am going to talk about the equipment I own and what you should look for if just stating out in electronics. With all of the equipment available on the used market, anyone beginning in electronics that is taking it seriously should have the basics: A good multimeter, a soldering station, and a current limiting adjustable power supply. Without these three items frustration will only ensue.
We all start somewhere and my start was with a $9 RadioShack soldering iron and a couple dollars more analog multimeter. While the meter suited me fine for a very long time, the $9 fire hazard was the most frustrating piece. I remember at the time reading my Radio Electronics (later Electronics Now) magazine and looking in the back advertising sections at the nice Weller soldering stations and amazing test equipment that was being made by companies like HP and Tektronix. I had only wished that I could have even a 20Mhz oscilloscope but with my non-existing income as being in middle school allowed, I had to settle for some basic test equipment like the multimeter I had.
My break came in 7th grade when one day I happened to notice that my science teacher had an oscilloscope in the labs storage closet. I questioned my teacher about it only to learn that it didn't work and had been there a very long time. To my surprise my teacher said I could have it if I wanted it which I enthusiastically accepted. It was a very old Bell+Howell model, most likely a kit originally. It had only a couple Mhz bandwidth and upon opening it was full of tubes. The issue it had was there was no horizontal sync, only a single dot burning a mark into its crt upon power on. I immediately pulled all the tubes and went to a local tv shop which I had remembered still had an old tube tester in the back (this was like 1993, tubes were still very obsolete). I tested all of the tubes and found a few that were definitely bad and purchased replacements. Upon powering on with new tubes in place, I finally could see into the time-domain of the circuits I was building. The 555 timer oscillator circuit I could finally see the waveform being generated. From my 1Mhz crystal oscillator I could see a near perfect square wave with a 50% duty cycle. It was a very exciting time. This only fueled the fire for things to come.
I dealt with basic equipment all thorough college, but once I had a job and could finally afford good test equipment, I went at it full force. It is amazing to see how cheap test equipment has become, especially on the used market.
Here is the current test equipment that I own as this is my current bench as it exists today:

A nice big workspace is key, I personally like deep desks which allow me to place bigger items far away from me without taking up valuable local workspace. I built the bench shown above as I was not able to find any workspace that nicely fit my needs. They do exist, but can cost a considerable amount of money. I built my bench with a strong shelf to hold most of my test equipment right at eye level, it had to be considerably strong as some of the older test equipment can weigh 60 pounds or more each (HP / Agilent builds things very well ;) ). Also shown is an anti-static mat as it it important to not destroy your expensive components before you get to use them. Now to talk about the equipment itself:
Multimeter. The absolute most important piece of test equipment for anyone. In my opinion this is the first thing anyone interested in electronics needs to buy. I use Fluke multimeters as they are the best, hands-down. I have a Fluke 77 II shown here along with a Fluke 73 (not shown). Need to see exactly how much voltage that power supply is putting out? Need to see how much current this circuit is really drawing? Need to see how many ohms that resistor really is? A multimeter has the answers. A good multimeter will pay for itself the first time you don't blow up the circuit you are working on out. I also still have my original Micronta analog multimeter and use it every now and then. Analog multimeters have the benefit of being able to see slow voltage changes over time by watching the needle move. Hook one up to an 110V outlet in your home to see what I mean, it shows a slow voltage inconsistency that a digital meter cannot easily display.

Soldering Iron, a good one. This is the 2nd most important tool anyone interested in electronics needs. An adjustable temperature one is best, especially dealing with temperature sensitive smd components. You are able to turn the temp down when needed, but also have the ability to crank it up when soldering or desoldering components on huge ground planes. I like Weller, but there are many good brands out there. A digital display is nice for being able to see what the current temperature is set at. The Weller below also has an anti-static tip to make sure you don't destroy any devices from rogue static charges on the iron itself.

Oscilloscope, the standard piece of test equipment when you are serious in electronics. I have many of them. An analog scope with decent bandwidth is still an extremely important piece of test equipment as it allows you to look into the time domains of signals to see what is really going on. The Tektronix 2246 seen here is an awesome scope. This is the scope I go to most even with the several digital scopes I own. Analog scopes are simply better for viewing complex analog waveforms such as a video signal. Everyone needs at least one good analog oscilloscope. I have talked about the benefits and disadvantages of analog vs digital scopes in previous posts, but it will deserve much more discussion in it's own dedicated post. If you are looking for your first scope, go for a 40Mhz to 100Mhz analog model IMO. It will serve you well. Above the Tektronix in the pic is a Racal-Dana 1992 1.3Ghz frequency counter which I will discuss shortly.

Digital oscilloscopes are extremely awesome as well. The one shown on the bottom here is a HP 54503A digital oscilloscope. it is a 500Mhz 4-channel digitizing oscilloscope. This is the scope I go to most when dealing with high speed digital signals. The 500Mhz bandwidth allows me to see very high speed repetitive signals easily.

The scope below is one of my favorites, an HP 54112D. It is a digital scope similar to the 54503A above, but offers may comprehensive triggering options. It is often used for glitch detection, where you are looking for an anomaly in a signal. Because it has digital storage options, it is able to store any waveform once the specified trigger has been hit allowing me to see what happened. This was very useful during the design of my own custom ttl based cpu last year.

Make sure you do not skimp on the scope probes! A good set of probes can easily cost more that the scope itself when buying used. A quality passive probe from HP / Agilent or Tektronix that is matched to the scope it will be used on is a must, especially when dealing with high speed signals. Using a cheap generic probe will distort the signal being measured and not truly represent the signal you are viewing on it's display. A cheap probe can also actually inject noise into a circuit destroying the signal you are attempting to observe. Pay attention to the probe attenuation factor as well. A 10X (attenuated by ten times) probe is good for most cases, but be aware it will be difficult to look at signals under about 10 millivolts with one. Be sure to compensate any passive probe before use, otherwise your signals could appear distorted.

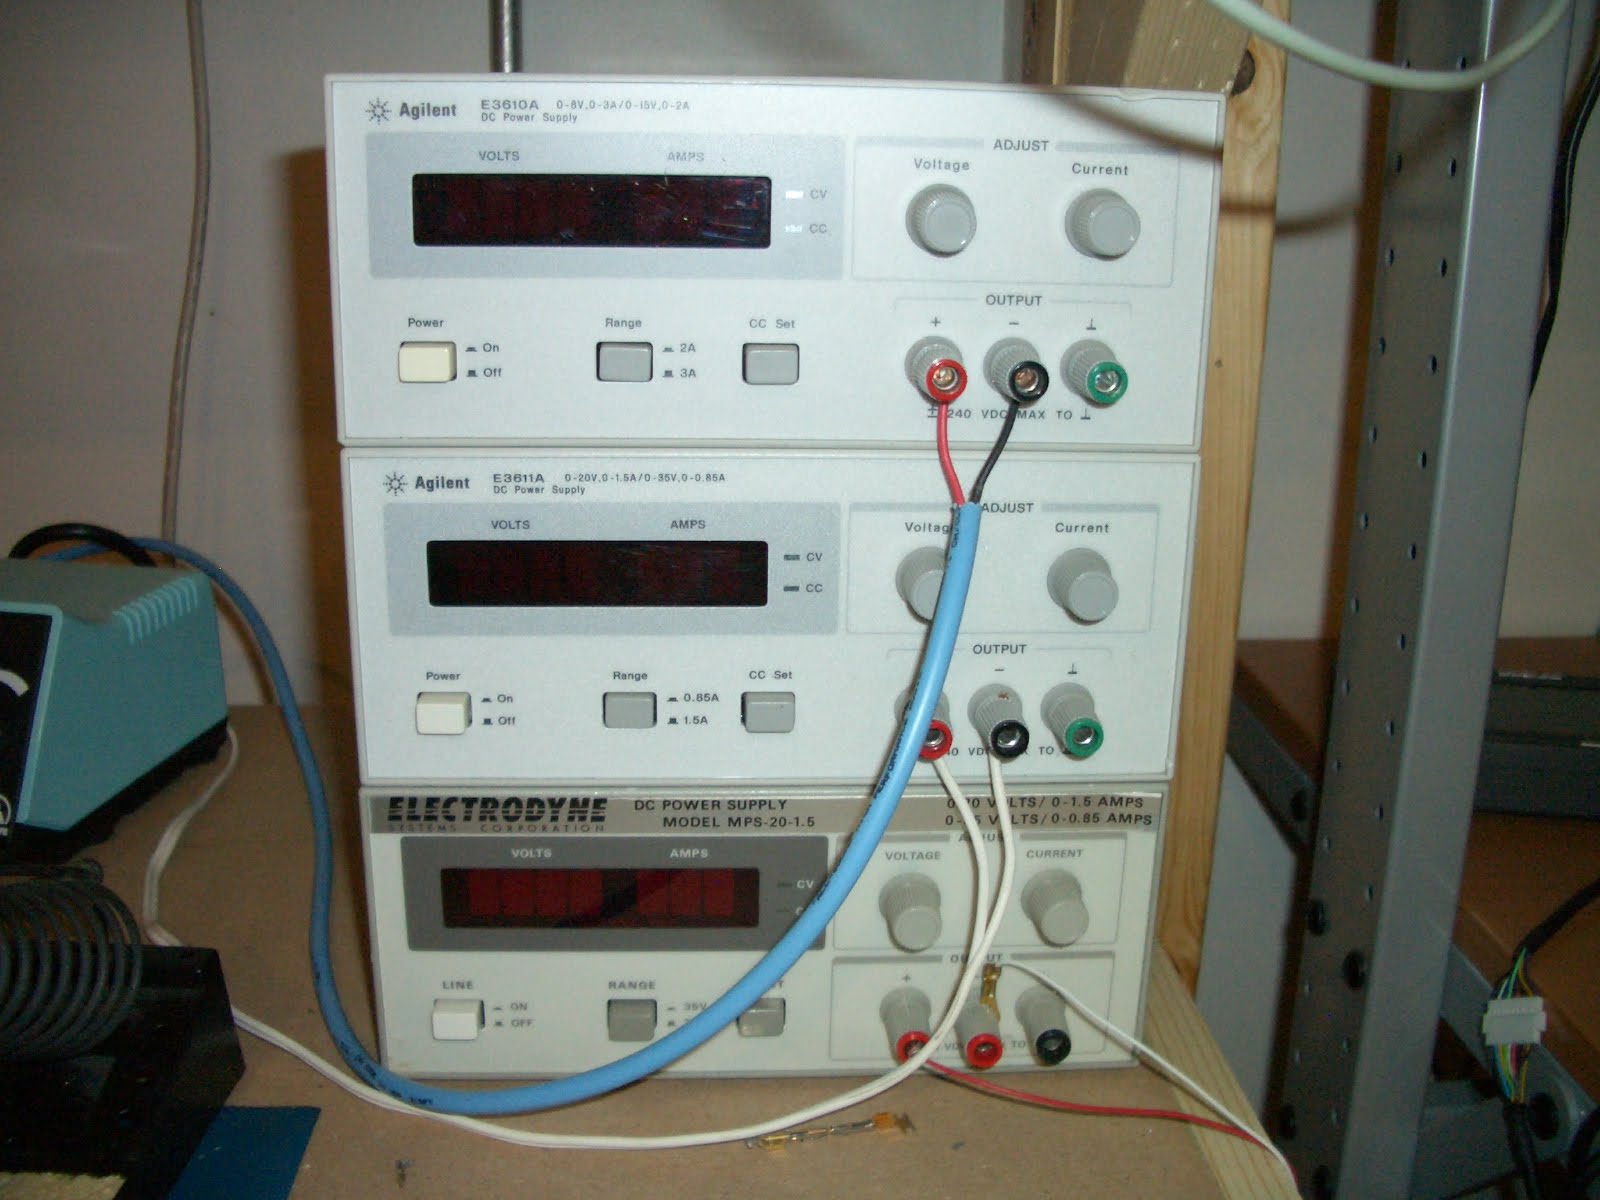
Power supplies. These are actually more important than a good oscilloscope for the beginner. An adjustable voltage, current limiting power supply will keep you from destroying your circuits in the event of a mistake. I have five of these and use them for everything. The ones below are all HP / Agilent models and are my favorite for the money. They are all adjustable voltage and current limiting which means you can prevent any load from drawing too much current. This is important because most power supplies can provide several if not many amps of current per given load. If you were to make a mistake in wiring your circuit and power it up with a non-current limiting power supply, you can plan to have that circuit go up in smoke. With supplies like the Agilent E3610 and E3611 shown below, you can set the current limit to N millamps / amps so that if there is a mistake it will protect your circuit from destroying itself.
I have seen some people modifying computer ATX PC power supplies for bench use and this is ultimately a horrible idea. Since they cannot current limit, using the 5V output on them could provide a huge surge current to your circuit before the power supplies protection circuit can go into effect , instantly blowing it up in your face. A current limiting supply will pay for itself the first time you make a mistake.

Logic analyzers are very important if you work with any type of digital logic. When I was designing my own CPU from scratch, this was an invaluable tool. Think of them as oscilloscopes, but differing in the fact that they can view many channels at once (think 16 to 128+ channels) and can only show states as defined per voltage thresholds for 0's and 1's over time. Basically if you need to watch many channels at once for lengths of time (a data or address bus), then to store the data... a logic analyzer is the answer. The HP 16500B shown below is my favorite with a color display and touch-screen control. It is a modular system allowing you to populate it with the boards you need. I picked mine up (I actually have three of them) from a local Dovebid auction fully populated. I had to get two of the three working, but now have a logic analyzer capable of up to 2Ghz resolution. I am only using one, keeping the others for spare parts. They are excellent tools for any digital design debugging and hardware hacking project.

PIC Programmers. PICs are my microcontroller of choice. I use Atmels and FPGAs as well, but PICs are my favorite. I use them in probably 75% of the projects I make. They are cheap, powerful, and with MPLab IDE free from Microchip along with their C compiler, I can have a working circuit in minutes. There are two programmers I use, The PicKit-2 and ICD-2. The PicKit-2 was my first programmer and still serves me well. It can program all devices with exception of PIC24, PIC32, and dsPICs. This is where the PicKit2 comes in, handling the more powerful smd PIC devices. Both have in-circuit programming capability which is nice as well. To program my microcontrollers, I have several computers at my bench. Today it is essential to have at least one for looking up component datasheets to programming your devices with your favorite IDE.

Breadboards, have had them forever and are so nice for prototyping. I use them all the time. I have many as often I have many projects going at once and don't want to scrap a circuit to start a new one. Be sure to have good wiring kits as well, nothing sucks more than not having the correct length wires to build a circuit.

Now it is time to talk RF. I love making RF filters and amplifiers and to test them you need good, stable RF generators. The two shown below combined cover all frequencies between 10Khz to 2.4Ghz. Each can be modulated with AM or FM carriers. The HP 8656B is a much newer unit with digital controls. It has option 001 (high stability timebase) which provides extremely accurate frequency generation. The model on top is an HP 8614A frequency generator which is older than I am. I picked this up on eBay for an amazing $20 and it works perfectly. It is an analog monster utilizing a klystron tube for RF generation.

A spectrum analyzer. This is the piece of test equipment I have wanted more than anything. Unlike an oscilloscope that lets you view into a signals time domain, a spectrum analyzer allows you to view a signals frequency domain. In the world of RF design, a spectrum analyzer shows you everything you want to know. The HP model 8922H below is actually a GSM / PCS cellular test set, but has option 006 which is a 10Mhz to 1Ghz spectrum analyzer.

Frequency counters are extremely useful for measuring frequencies in oscillators or any clock / RF source. The one shown below by Startek is a handheld model designed for sniffing out transmitters and other RF sources. It can also be used with a good probe to measure frequencies of any clock or RF source up to 2.4Ghz. Earlier above I showed my Racal-Dana bench top frequency counter which has a higher resolution then the Startek. I use both to measure RF frequencies in clock sources, RF sources, and to make sure any frequency is what it is supposed to be. You can use an oscilloscope (provided it's bandwidth is high enough) to measure frequency too, but frequency counters usually have much higher resolution.

Second bench, this bench is just spare space with a Tektronix TDS-420 digital oscilloscope and analog current limiting power supply. I use it for quick testing of devices when my main bench is full of clutter. Also seen is a small parts cabinet, and plenty of spools of chemicals, solder wick, and solder (use ROHS solder!, lead is not good. Yes, solder with lead does flow better but you will get used to the non-lead stuff).

More work space, of course completely cluttered, but more space is always needed. The dry erase board in background is always fun for drawing up new ideas.

This bench is where I work on enclosures and any type of metal or plastic work needed for a project. By far a drill press is the most used tool I own. The band saw and newly added milling machine help considerably when working with aluminum and plastic parts for enclosure panels.

The parts rack is the goto place for components. Keep everything you have organized so you spend less time looking for components and more time actually working on designing and assembling!


 A nice big workspace is key, I personally like deep desks which allow me to place bigger items far away from me without taking up valuable local workspace. I built the bench shown above as I was not able to find any workspace that nicely fit my needs. They do exist, but can cost a considerable amount of money. I built my bench with a strong shelf to hold most of my test equipment right at eye level, it had to be considerably strong as some of the older test equipment can weigh 60 pounds or more each (HP / Agilent builds things very well ;) ). Also shown is an anti-static mat as it it important to not destroy your expensive components before you get to use them. Now to talk about the equipment itself:
 Soldering Iron, a good one. This is the 2nd most important tool anyone interested in electronics needs. An adjustable temperature one is best, especially dealing with temperature sensitive smd components. You are able to turn the temp down when needed, but also have the ability to crank it up when soldering or desoldering components on huge ground planes. I like Weller, but there are many good brands out there. A digital display is nice for being able to see what the current temperature is set at. The Weller below also has an anti-static tip to make sure you don't destroy any devices from rogue static charges on the iron itself.
 Oscilloscope, the standard piece of test equipment when you are serious in electronics. I have many of them. An analog scope with decent bandwidth is still an extremely important piece of test equipment as it allows you to look into the time domains of signals to see what is really going on. The Tektronix 2246 seen here is an awesome scope. This is the scope I go to most even with the several digital scopes I own. Analog scopes are simply better for viewing complex analog waveforms such as a video signal. Everyone needs at least one good analog oscilloscope. I have talked about the benefits and disadvantages of analog vs digital scopes in previous posts, but it will deserve much more discussion in it's own dedicated post. If you are looking for your first scope, go for a 40Mhz to 100Mhz analog model IMO. It will serve you well. Above the Tektronix in the pic is a Racal-Dana 1992 1.3Ghz frequency counter which I will discuss shortly.
 Digital oscilloscopes are extremely awesome as well. The one shown on the bottom here is a HP 54503A digital oscilloscope. it is a 500Mhz 4-channel digitizing oscilloscope. This is the scope I go to most when dealing with high speed digital signals. The 500Mhz bandwidth allows me to see very high speed repetitive signals easily.
 Make sure you do not skimp on the scope probes! A good set of probes can easily cost more that the scope itself when buying used. A quality passive probe from HP / Agilent or Tektronix that is matched to the scope it will be used on is a must, especially when dealing with high speed signals. Using a cheap generic probe will distort the signal being measured and not truly represent the signal you are viewing on it's display. A cheap probe can also actually inject noise into a circuit destroying the signal you are attempting to observe. Pay attention to the probe attenuation factor as well. A 10X (attenuated by ten times) probe is good for most cases, but be aware it will be difficult to look at signals under about 10 millivolts with one. Be sure to compensate any passive probe before use, otherwise your signals could appear distorted.

 Breadboards, have had them forever and are so nice for prototyping. I use them all the time. I have many as often I have many projects going at once and don't want to scrap a circuit to start a new one. Be sure to have good wiring kits as well, nothing sucks more than not having the correct length wires to build a circuit.


 This really made all the difference to receiving APT satellites. With a general purpose receiver like the ICom (still way better than any general purpose scanner) it has less than ideal bandwidth compare to a dedicated APT receiver. With the CIV interface, WXtoImg can tune the Icom as necessary to compensate for doppler shift as the satellite passes by. It will also automatically tune to the correct NOAA APT frequency. Previously I would tune manually by watching signal strength and listening to the familiar tick-tock synchronization sounds for best quality. This course was still not perfect and led to noisy signals. With WXtoImg tuning my receiver for me, there were no issues. I still had some slight noise on the extreme ends of the signal, but it is expected when dealing with the narrower bandwidth. This resulted with near-perfect images from horizon to horizon.


 I have just started playing with this chip and have discovered how easy and powerful it is to use. I have one project in mind for it that I am starting on now and will post again once it is further developed.


 These spindle motors are basically a small three phase motor. My initial assumption to drive them was that you would need to provide each phase a voltage pulse in sequence to create rotation. Looking at a drive with my scope I could see that this was definitely not the case. The waveform on each pin was extremely complex, actually so complex that all of my Agilent and Tektronix digital scopes had a hard time capturing the waveform. My best success in capturing was with my Tektronix analog scope. The waveform to one of the phases can be seen here:
 This shows again how as awesome as digital scopes are, sometimes an analog scope can provide a better picture of the waveform you are trying to see. :)
 Once initial rotation is established you can begin decreasing the delay between pulses to increase the spindle rotation speed. Driving the motor with a square wave, I am able to reach speeds just over 100Hz (6000 rpm) before the motor begins decreasing speed.

